Secure Your Spring Boot App with JWT Authentication: A Comprehensive Guide

Some prerequisites for working with Spring Boot and JWT Authentication include:
Basic knowledge of Java programming language and web application development.
Familiarity with Spring framework and its core concepts.
Understanding of RESTful web services and HTTP protocol.
Basic knowledge of JSON data format and its syntax.
Familiarity with authentication and authorization mechanisms.
Knowledge of security best practices and techniques, such as encryption and hashing algorithms.
Introduction
A. Explanation of Spring Security 6
Spring Security is a framework that provides various security features like authentication, and authorization to create secure Java Enterprise Applications. It is the de facto standard for securing Spring-based applications.
B. Overview of JWT Authentication
JSON Web Token (JWT) is a JSON-based standard (RFC 7519) that provides a secured means of exchanging claims between two parties. This information can be verified and trusted because it is digitally signed. JWTs can be signed using a secret (with the HMAC algorithm) or a public/private key pair using RSA or ECDSA.
Although JWTs can be encrypted to also provide secrecy between parties, we will focus on signed tokens. Signed tokens can verify the integrity of the claims contained within them, while encrypted tokens hide those claims from other parties.
C. Components of JWT Authentication
Header
The header typically consists of two parts: the type of the token, which is JWT, and the algorithm that is used, such as HMAC SHA256 or RSA SHA256. It is Base64Url encoded to form the first part of the JWT.
Payload
The payload is part of the JWT where all the user data is added. This data is also referred to as the ‘claims’ of the JWT. This part generally contains useful information which is presented as a JSON object then this JSON object is encoded to BASE64URL.
Signature
The signature of a JWT is critical because it guarantees the integrity of the payload and the header. Verifying the signature must be the first step that any consumer of a JWT performs. If the signature doesn’t match, no further processing should take place.
How the JWT authentication works in Spring boot
The first and foremost thing we have to remember is that when the spring boot server gets executed and if the JWT filters are present there, they will be executed on the first step.
Working

An internal check would be performed to see if the JWT filter has a token for the authorization process. So if it is missing or wrong for a specific user, it will throw a 403 Bad Request to the client.
But, if it gets a 200 OK request then the validation process gets started. As part of the validation process, the first call is made from UserDetailsService to check the user email address that was used as a subject of the Token, which is retrieved from the integrated database. Now we get the response of the JWT authentication filter that calls the JWT service which takes the generated token as a parameter.
Implementing JWT Authentication with Spring Boot
The project is made through the website -: https://start.spring.io/ with the following dependencies.

Here, we are using H2 Database which is an embedded, open-source, and in-memory database. It is a relational database management system written in Java. It is a client/server application. It is generally used in unit testing. It stores data in memory, not persist the data on disk.
We will also use Lombook dependency to get the auto-generated Getters, Setters, All Args Constructor, and No Args Constructor.
Then go to the website https://mvnrepository.com/artifact/io.jsonwebtoken/jjwt/0.9.1
to get the dependency of JSON Web token and add it to the pom.xml file from the project.
We are going to tell the two methods through that you can generate the token:
1) Creating a token without signing the signature using a secret key
The project structure would be something like this:
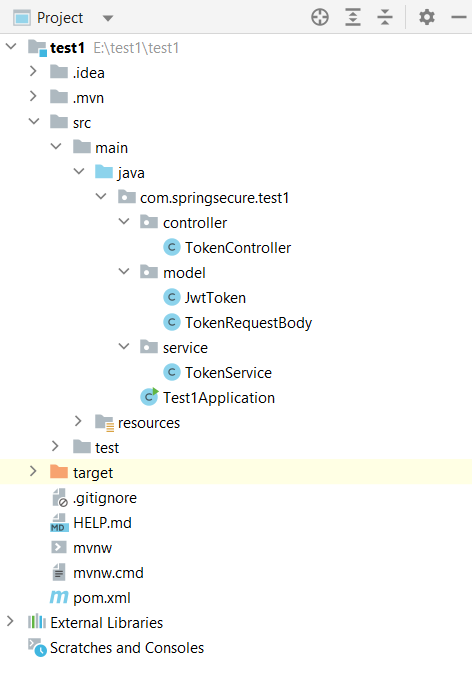
Make sure all the dependencies should be there to run this project successfully. Attaching the pom.xml file for your reference
<?xml version="1.0" encoding="UTF-8"?>
<project xmlns="http://maven.apache.org/POM/4.0.0" xmlns:xsi="http://www.w3.org/2001/XMLSchema-instance"
    xsi:schemaLocation="http://maven.apache.org/POM/4.0.0 https://maven.apache.org/xsd/maven-4.0.0.xsd">
    <modelVersion>4.0.0</modelVersion>
    <parent>
        <groupId>org.springframework.boot</groupId>
        <artifactId>spring-boot-starter-parent</artifactId>
        <version>3.0.5</version>
        <relativePath/> <!-- lookup parent from repository -->
    </parent>
    <groupId>com.springsecure</groupId>
    <artifactId>test1</artifactId>
    <version>0.0.1-SNAPSHOT</version>
    <name>test1</name>
    <description>Project for Spring Security</description>
    <properties>
        <java.version>17</java.version>
    </properties>
<!-- All the required dependencies -->
    <dependencies>
        <dependency>
            <groupId>org.springframework.boot</groupId>
            <artifactId>spring-boot-starter-web</artifactId>
        </dependency>

        <dependency>
            <groupId>org.springframework.boot</groupId>
            <artifactId>spring-boot-devtools</artifactId>
            <scope>runtime</scope>
            <optional>true</optional>
        </dependency>
        <!-- API, java.xml.bind module -->
        <dependency>
            <groupId>jakarta.xml.bind</groupId>
            <artifactId>jakarta.xml.bind-api</artifactId>
            <version>2.3.2</version>
        </dependency>

        <!-- Runtime, com.sun.xml.bind module -->
        <dependency>
            <groupId>org.glassfish.jaxb</groupId>
            <artifactId>jaxb-runtime</artifactId>
            <version>2.3.2</version>
        </dependency>
        <dependency>
            <groupId>com.h2database</groupId>
            <artifactId>h2</artifactId>
            <scope>runtime</scope>
        </dependency>
        <!-- https://mvnrepository.com/artifact/org.projectlombok/lombok -->
        <dependency>
            <groupId>org.projectlombok</groupId>
            <artifactId>lombok</artifactId>
            <version>1.18.24</version>
            <scope>provided</scope>
        </dependency>
        <!-- https://mvnrepository.com/artifact/io.jsonwebtoken/jjwt -->
        <dependency>
            <groupId>io.jsonwebtoken</groupId>
            <artifactId>jjwt</artifactId>
            <version>0.9.1</version>
        </dependency>
        <dependency>
            <groupId>org.springframework.boot</groupId>
            <artifactId>spring-boot-starter-test</artifactId>
            <scope>test</scope>
        </dependency>
    </dependencies>

    <build>
        <plugins>
            <plugin>
                <groupId>org.springframework.boot</groupId>
                <artifactId>spring-boot-maven-plugin</artifactId>
            </plugin>
        </plugins>
    </build>

</project>
The JwtToken class in the model package :
package com.springsecure.test1.model;

import lombok.Data;

@Data
public class JwtToken {
    private String accountType;
    private String jwtToken;
}
Here we are simply making the response that how it should be displayed when hitting the URL from the Postman or some web browser.
The annotation Data is from the Lombook dependency to generate all the getters and setters and make the code clean.
The TokenRequestBody class in the model package :
package com.springsecure.test1.model;
import lombok.Data;

@Data
public class TokenRequestBody {
    private String accountNumber;
    private String accountType;
    private String userType;
}
Here, we are going to provide the details in form of JSON data for which accountType the token would be generated.
The TokenService class in the service package :
package com.springsecure.test1.service;
import com.springsecure.test1.model.JwtToken;
import com.springsecure.test1.model.TokenRequestBody;
import io.jsonwebtoken.Jwts;
import org.springframework.stereotype.Service;
import java.sql.Date;
import java.time.Instant;
import java.time.temporal.ChronoUnit;
import java.util.UUID;
import org.springframework.http.HttpHeaders;
@Service
public class TokenService {
    public JwtToken generateToken(TokenRequestBody body, HttpHeaders headers) {
        String jwtToken = Jwts.builder()
                .claim("accountNumber", body.getAccountNumber())
                .claim("accountType", body.getAccountType())
                .claim("userType", body.getUserType())
                .setId(UUID.randomUUID().toString())
                .setIssuedAt(Date.from(Instant.now()))
                .setExpiration(Date.from(Instant.now().plus(10, ChronoUnit.MINUTES)))
                .compact();
        JwtToken jwtTokenObject = new JwtToken();
        jwtTokenObject.setJwtToken(jwtToken);
        jwtTokenObject.setAccountType(headers.getFirst("accountType"));
        return jwtTokenObject;
    }
}
In this code, we are simply taking the TokenRequestBody and HttpHeaders as a parameter.
The claims are the accountNumber, accountType, and userType which will be treated as payload in the token and the Id has been set as a random UUID(Universally unique identifier).
We have made the Expiration time of the token: 10 mins, you can keep it as many minutes or hours as you want. After that, the calling of the JwtToken object has been done to set the token and the header to which we selected the accountType, you can also select the accountNumber or userType.
The TokenController class in the controller package :
package com.springsecure.test1.controller;
import com.springsecure.test1.model.JwtToken;
import com.springsecure.test1.model.TokenRequestBody;
import com.springsecure.test1.service.TokenService;
import org.springframework.beans.factory.annotation.Autowired;
import org.springframework.http.HttpStatus;
import org.springframework.http.ResponseEntity;
import org.springframework.web.bind.annotation.PostMapping;
import org.springframework.web.bind.annotation.RequestBody;
import org.springframework.web.bind.annotation.RequestHeader;
import org.springframework.web.bind.annotation.RestController;
import org.springframework.http.HttpHeaders;

@RestController
public class TokenController {
    @Autowired
    private TokenService tokenService;
    @PostMapping("/generate/jwt/token")
    public ResponseEntity<JwtToken> generateJwtToken(
            @RequestBody TokenRequestBody body,
            @RequestHeader(value = "apiversion", required=true) String apiVersion,
            @RequestHeader(value = "accountType", required=true) String accountType,
            @RequestHeader(value = "messageId", required = true) String messageIds
    ) {
        HttpHeaders headers = new HttpHeaders();
        headers.add("apiversion", apiVersion);
        headers.add("accountType", accountType);
        headers.add("messageId", messageIds);
        return new ResponseEntity<JwtToken>(tokenService.generateToken(body, headers), HttpStatus.OK);
    }
}
In this code, we have used the headers: apiVersion, accountType, and messageId which we will input manually. After that, we are calling the HttpHeaders class to add all these headers and encapsulate them to generate the token with the help of these headers and the body as a parameter.
If our API is executed successfully, it will show the 200 OK request, otherwise, it will show 500 Error request.
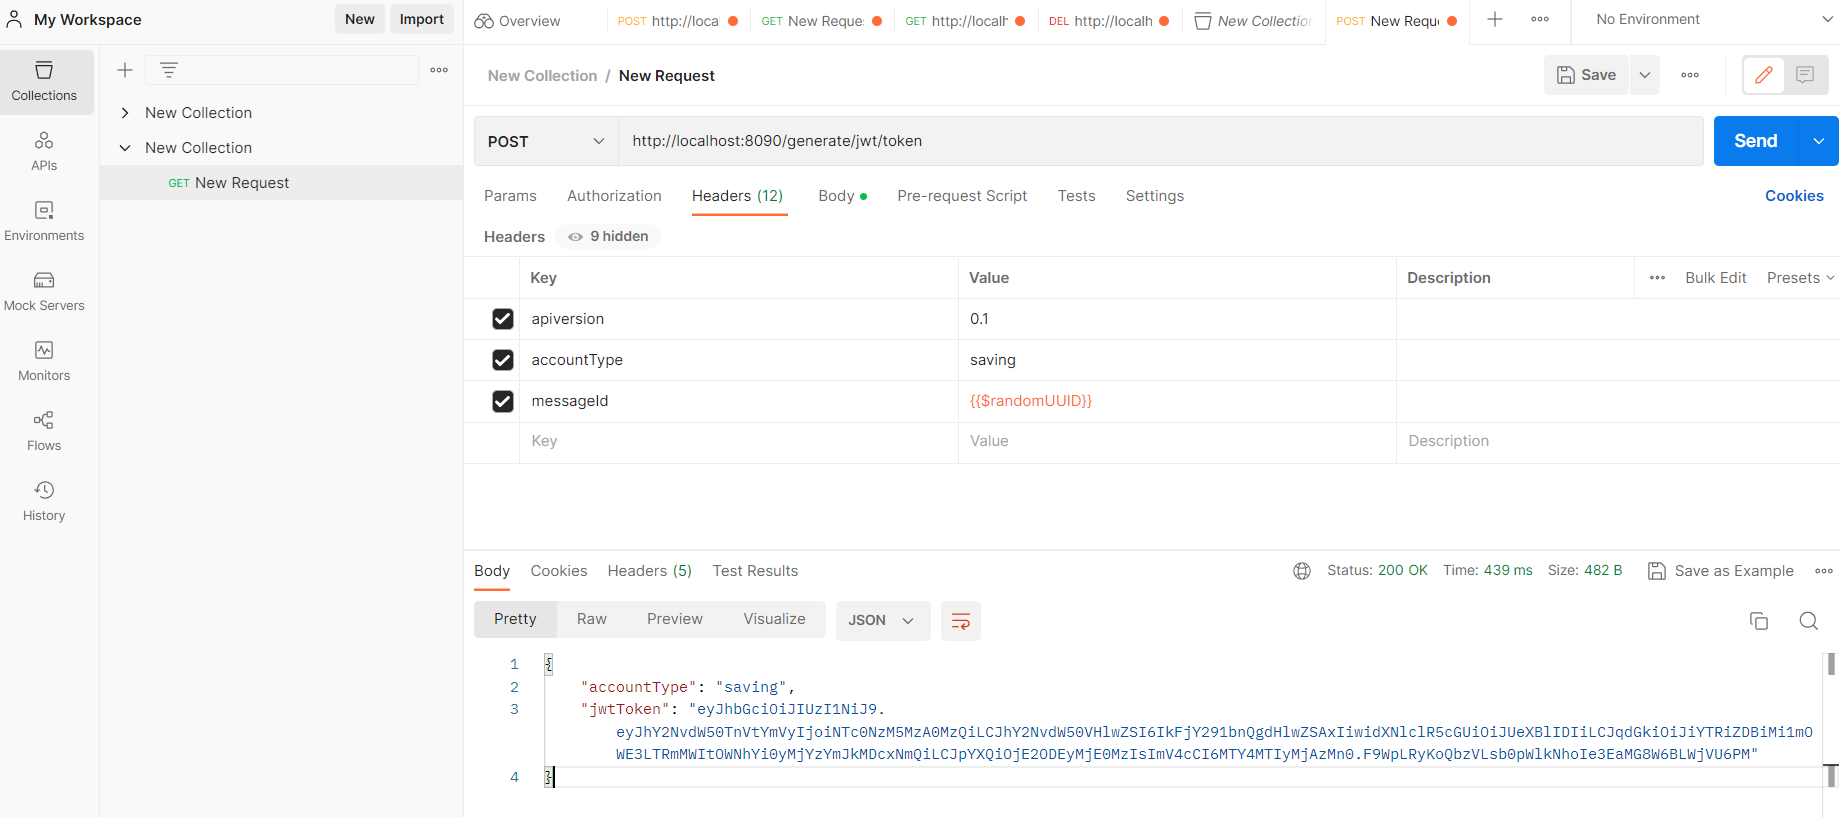
Testing the API using the Postman
Firstly, run the spring boot project and check on which port it is running, generally the tomcat always starts on port 8080.
Type the URL in the URL bar and select the POST method. Go to the body option -> select raw, inside that select JSON.

After that go to the Headers option to provide the headers which we have made in TokenController class.

In the messageId header, we are using UUID which will be automatically generated. Finally, click on the Send button to get the output according to your input.

2) Creating a JWT Token: Creating a JWT token involves generating a token using a secret key and the user's credentials.
We have made a new package named utils and inside that, there is an ApplicationConfig class which consists of a method name for getting the secret key from the application.properties file present in the resources.
The implementation of ApplicationConfig class:
package com.springsecure.test1.util;

import lombok.Data;
import org.springframework.boot.context.properties.ConfigurationProperties;
import org.springframework.stereotype.Component;
@Data
@Component
@ConfigurationProperties(prefix = "app")
public class ApplicationConfig {
    private String secretKey;
    public String getSecretKey() {
    return secretKey;
    }
}
We use the annotation Component across the application to mark the beans as Spring’s managed components. Such classes are considered candidates for auto-detection when using annotation-based configuration and classpath scanning.
Spring Boot annotation ConfigurationProperties is letting developer maps the entire .properties and .yml file into an object easily. In code, the prefix: "app" means that the application.properties must contain the key of the same name for accurate recognition.
Go to the application.properties and type the following code:
app.secret-key=EBFP+jbGPl9N8bb6atWqFZiVLiz/DoCu6OPd71KPx4BQpqdqbKqS8/piA80HlUCWnZo5vgs50buwBK+Juzvseg==
server.port = 8090
Note: We have generated the secret code from the website -> https://generate.plus/en/base64
Now, we will alter some code in TokenService class and will use an in-built decoder method to decode our secret key for the authentication.
package com.springsecure.test1.service;

import com.springsecure.test1.model.JwtToken;
import com.springsecure.test1.model.TokenRequestBody;
import com.springsecure.test1.util.ApplicationConfig;
import io.jsonwebtoken.Jwts;
import io.jsonwebtoken.SignatureAlgorithm;
import org.springframework.beans.factory.annotation.Autowired;
import org.springframework.stereotype.Service;

import java.security.Key;
import java.sql.Date;
import java.time.Instant;
import java.time.temporal.ChronoUnit;
import java.util.Base64;
import java.util.UUID;
import org.springframework.http.HttpHeaders;

import javax.crypto.spec.SecretKeySpec;
@Service
public class TokenService {
    @Autowired
    private ApplicationConfig applicationConfig;
 public JwtToken generateTokenUsingSecretKey(TokenRequestBody body, HttpHeaders headers) {

        Key hmacKey = new SecretKeySpec(Base64.getDecoder().decode(applicationConfig.getSecretKey()),
                SignatureAlgorithm.HS256.getJcaName());
        String jwtToken = Jwts.builder()
                .claim("accountNumber", body.getAccountNumber())
                .claim("accountType", body.getAccountType())
                .claim("userType", body.getUserType())
                .setId(UUID.randomUUID().toString())
                .setIssuedAt(Date.from(Instant.now()))
                .setExpiration(Date.from(Instant.now().plus(10, ChronoUnit.MINUTES)))
                .signWith(SignatureAlgorithm.HS256, hmacKey)
                .compact();

        JwtToken jwtTokenObject = new JwtToken();
        jwtTokenObject.setJwtToken(jwtToken);
        jwtTokenObject.setAccountType(headers.getFirst("accountType"));
        return jwtTokenObject;
    }

}
Here we used Base64 decoder and a Signature Algorithm(HS256) for the signature using our secret key. And, if you do not want to use the Decoder method then also it's fine because the latest version now have supported decoders in Jwt builders itself.
In the TokenController class, just change the method name of tokenService object made earlier and you are good to go for testing the API.
Verifying JWT Token: Verifying a JWT token involves decoding the token and verifying the signature using the secret key
Go to the TokenService class and make a method that will take the token as a parameter and return the claims associated with it.
package com.springsecure.test1.service;

import com.springsecure.test1.model.JwtToken;
import com.springsecure.test1.model.TokenRequestBody;
import com.springsecure.test1.util.ApplicationConfig;
import io.jsonwebtoken.Claims;
import io.jsonwebtoken.Jwts;
import io.jsonwebtoken.SignatureAlgorithm;
import org.springframework.beans.factory.annotation.Autowired;
import org.springframework.stereotype.Service;

import java.security.Key;
import java.sql.Date;
import java.time.Instant;
import java.time.temporal.ChronoUnit;
import java.util.Base64;
import java.util.UUID;
import org.springframework.http.HttpHeaders;

import javax.crypto.spec.SecretKeySpec;

@Service
public class TokenService {
    @Autowired
    private ApplicationConfig applicationConfig;

    public JwtToken generateTokenUsingSecretKey(TokenRequestBody body, HttpHeaders headers) {

        Key hmacKey = new SecretKeySpec(Base64.getDecoder().decode(applicationConfig.getSecretKey()),
                SignatureAlgorithm.HS256.getJcaName());
        String jwtToken = Jwts.builder()
                .claim("accountNumber", body.getAccountNumber())
                .claim("accountType", body.getAccountType())
                .claim("userType", body.getUserType())
                .setId(UUID.randomUUID().toString())
                .setIssuedAt(Date.from(Instant.now()))
                .setExpiration(Date.from(Instant.now().plus(10, ChronoUnit.MINUTES)))
                .signWith(SignatureAlgorithm.HS256, hmacKey)
                .compact();

        JwtToken jwtTokenObject = new JwtToken();
        jwtTokenObject.setJwtToken(jwtToken);
        jwtTokenObject.setAccountType(headers.getFirst("accountType"));
        return jwtTokenObject;
    }

    public Claims parseJwt(String jwtToken) {
        Claims jwt = Jwts.parser()
                .setSigningKey(applicationConfig.getSecretKey())
                .parseClaimsJws(jwtToken)
                .getBody();
        return jwt;
    }
}
In this code, we are just parsing through the secret key and getting the claims or information of the string jwtToken.
In the TokenController class make a API of validating the token of a specific account.
  @PostMapping("/validate/jwt/token")
    public Claims jwtTokenValidate(
            @RequestHeader(value = "token", required=true) String jwtToken,
            @RequestHeader(value = "apiversion", required=true) String apiVersion,
            @RequestHeader(value = "accountType", required=true) String accountType,
            @RequestHeader(value = "messageId", required = true) String messageIds
    ) {
        return tokenService.parseJwt(jwtToken);
    }
Add another header of token that will be generated by using the generateJwtToken method so that the validation can be done.
Testing the API via Postman:

Hurray! We get the same accountType and other associated claims of the previously generated token.
Conclusion
In conclusion, Spring Boot with JWT Authentication is a powerful and flexible platform for building secure web applications in Java.
JWT authentication provides a simple yet effective mechanism for authenticating and authorizing users. Spring Boot offers a range of components and features for implementing this mechanism.
By using Spring Boot with JWT Authentication, developers can build scalable and secure web applications easily. With the continued development and integration of emerging technologies, Spring Boot with JWT Authentication's future is bright. We can expect continued innovation and growth in this area.


