"Revolutionize Your Data Management with Spring Boot and MongoDB: A Complete Guide to Mastering CRUD Operations"


PermalinkIntroduction
PermalinkA) Spring Boot
It is an open-source, microservice-based Java web framework. Spring Boot makes it easy to create stand-alone, production-grade Spring-based Applications that you can simply run.
It takes an opinionated view of the Spring platform, which paves the way for a faster and more efficient development ecosystem.
PermalinkB) MongoDB
MongoDB is an open-source NoSQL database management program. It is a tool that can manage document-oriented information, and store or retrieve information. NoSQL databases are quite useful for working with large sets of distributed data.
PermalinkC) CRUD Operation
In the programming world, the acronym CRUD stands for create, read, update, and delete. These are the four basic functions of persistent storage. It refers to all functions executed in relational database applications and mapped to a standard HTTP method or DDS operation.
PermalinkSetting up the Environment
PermalinkCreating a new Spring Boot project
We have created the project using Spring Initializr. You can give any name of the project you want but be careful in selecting the dependencies. It is advisable to take reference from the image attached below.
Note: Select the java version which you have installed on your system.
Link for the website: https://start.spring.io/.
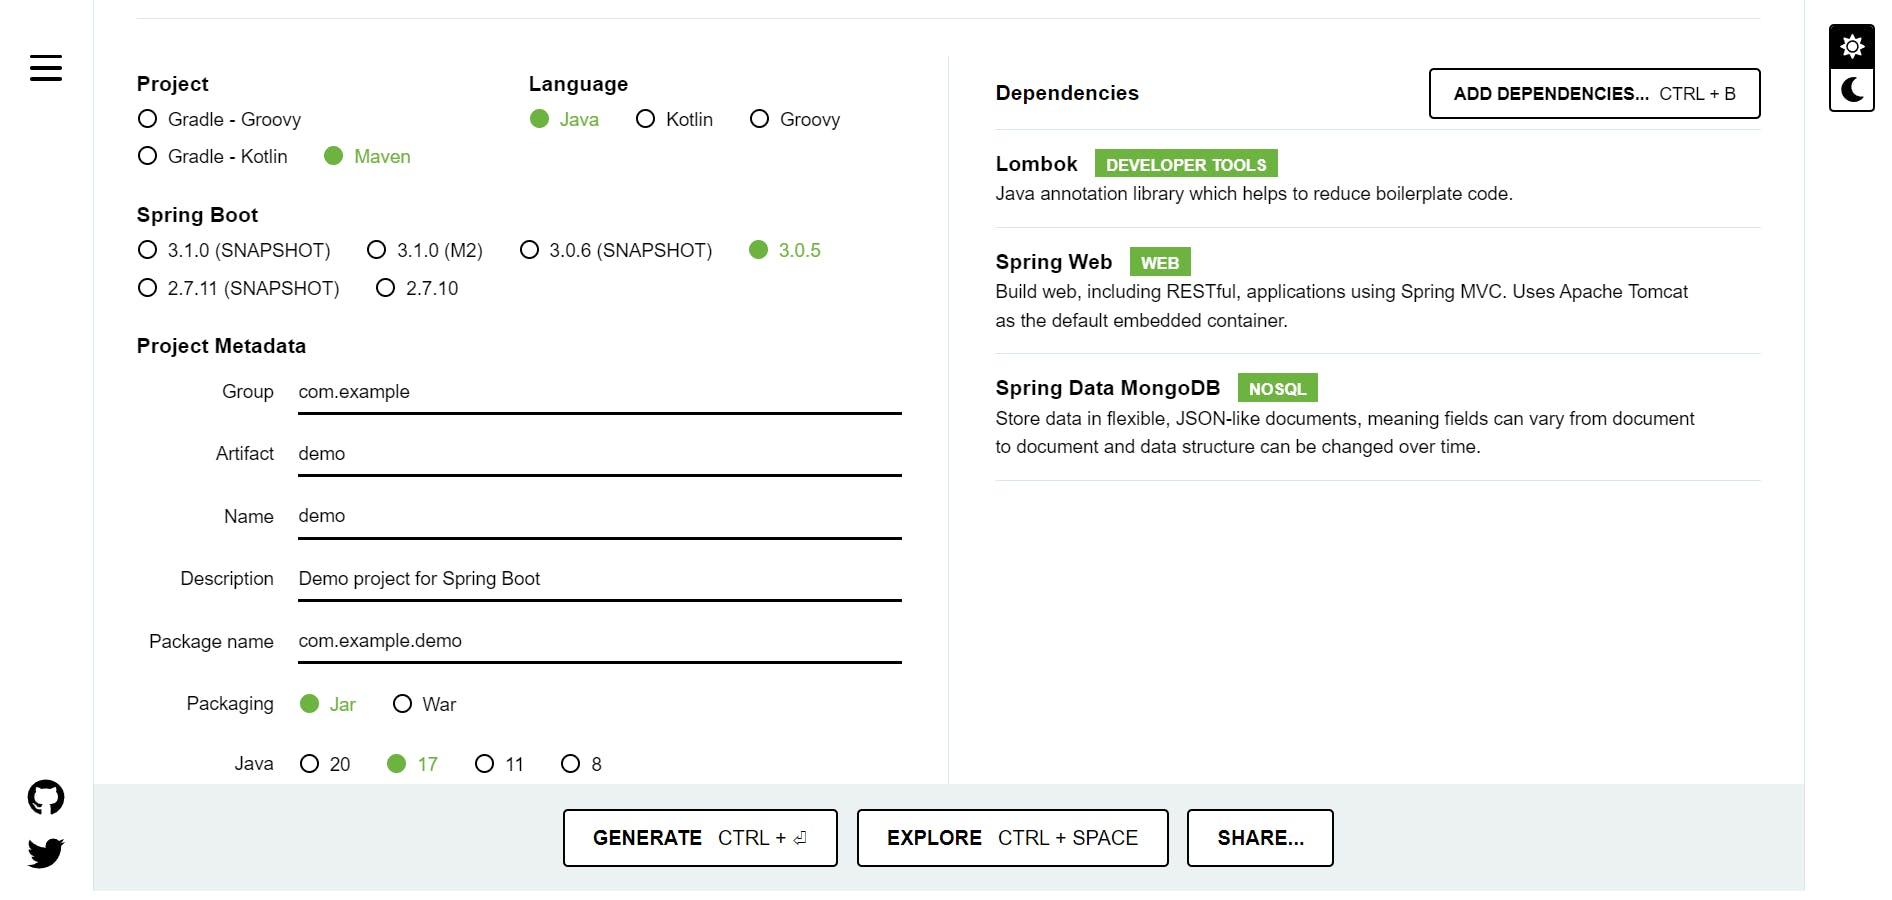
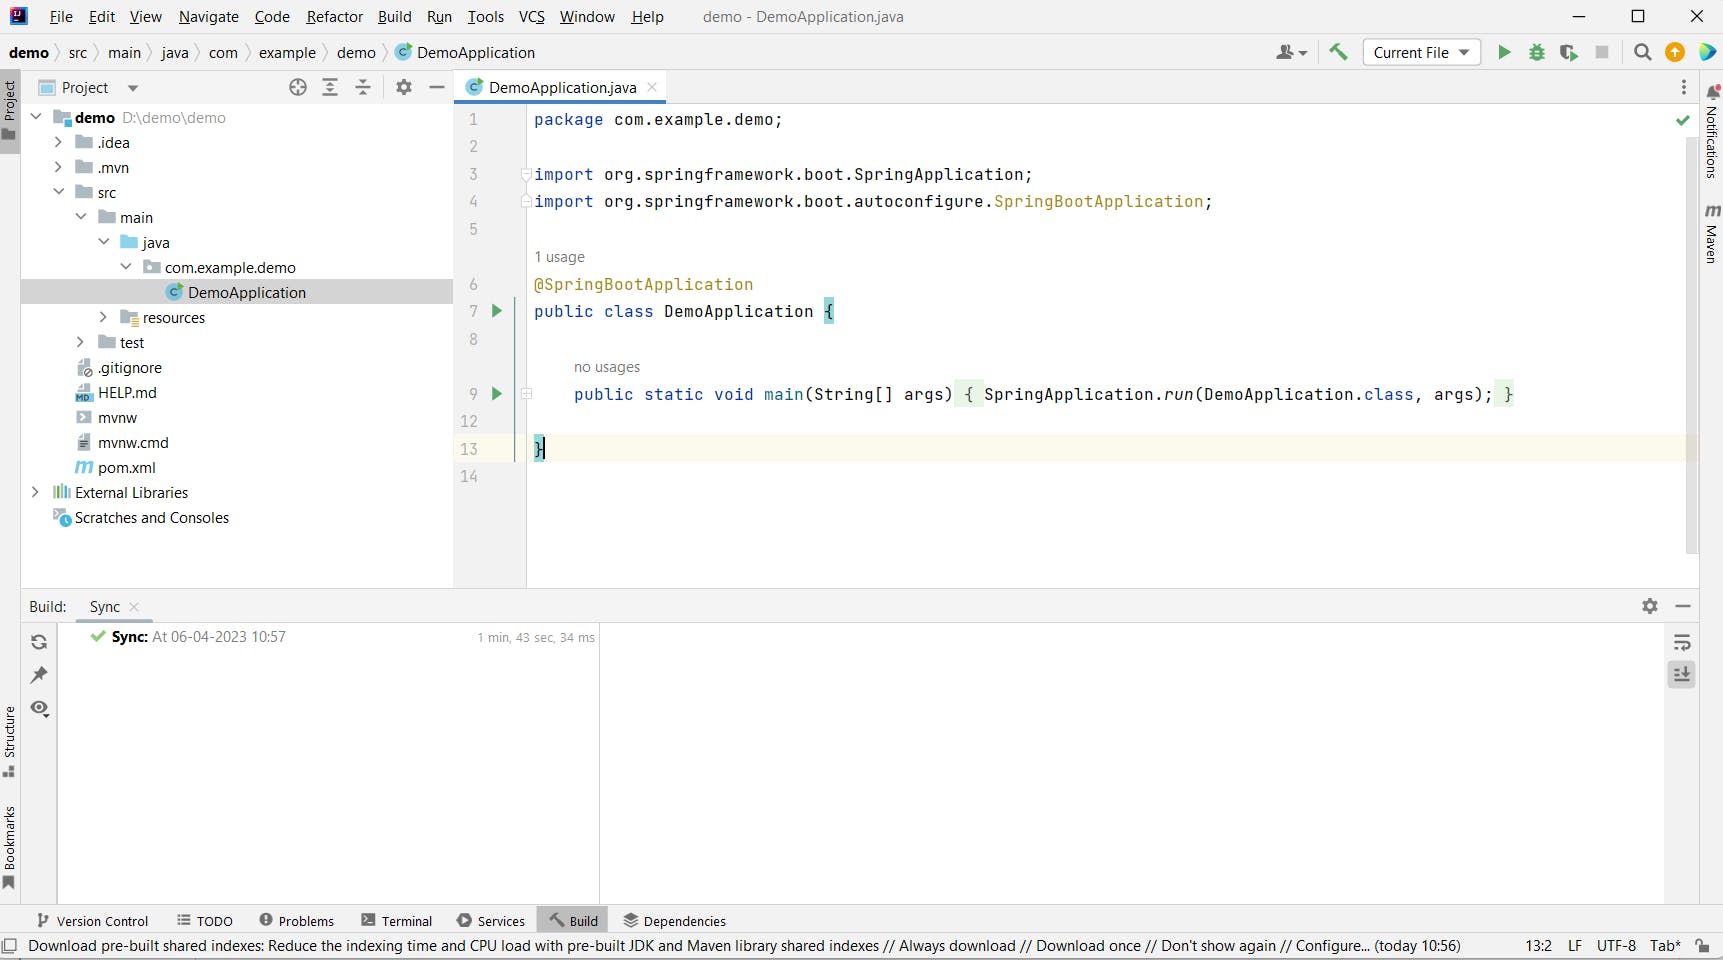
After following the same, click on GENERATE button. It will lead to the download of a zip file on the path which you have selected. Unzip the file and import it on any IDE(Eclipse, IntelliJ, Netbeans, BlueJ etc). We have used IntelliJ after importing, some dependencies will take time to download. After the installation of everything IntelliJ will look like this in the image given below:
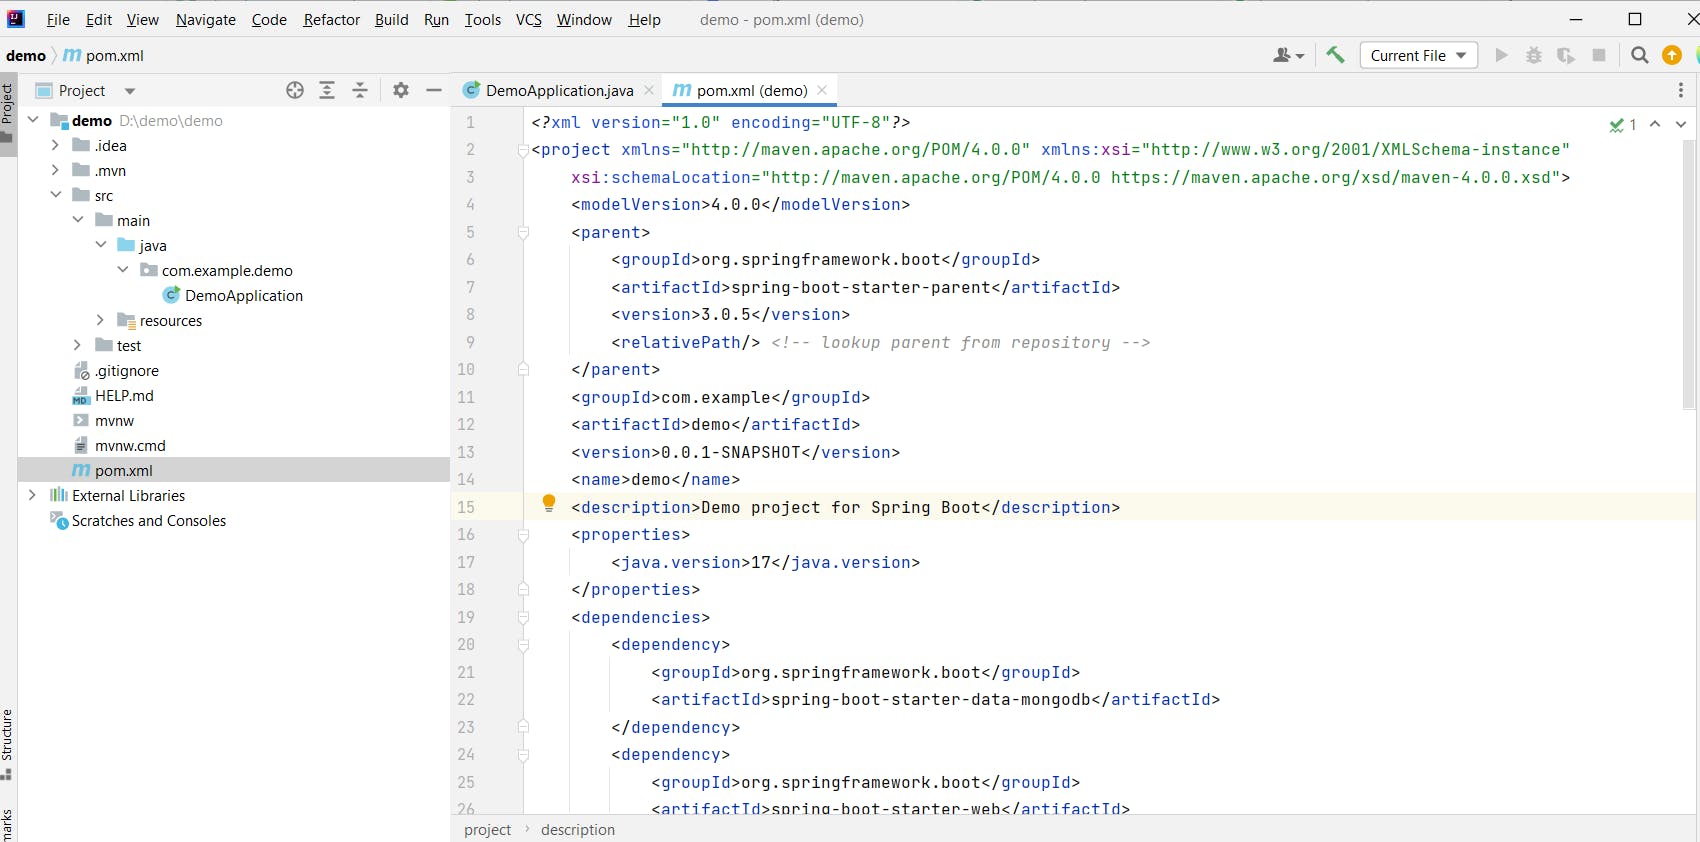
Open the pom.xml file. Now you can see all the configurations and dependencies which you picked earlier.
PermalinkConfiguring MongoDB
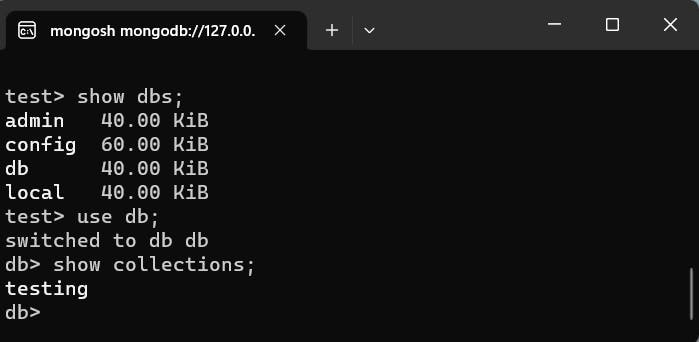
PermalinkCreating a MongoDB database
We have made a database name "db" and inserted a dummy collection name "testing".
PermalinkConfiguring MongoDB connection in Spring Boot
In the project open the resources file -> then the application.properties file

In the image given below, write line1 and line 2 as it is and in line3 just change the database name as you have made in monoDB earlier.
PermalinkHow the API is going to work: Architecture
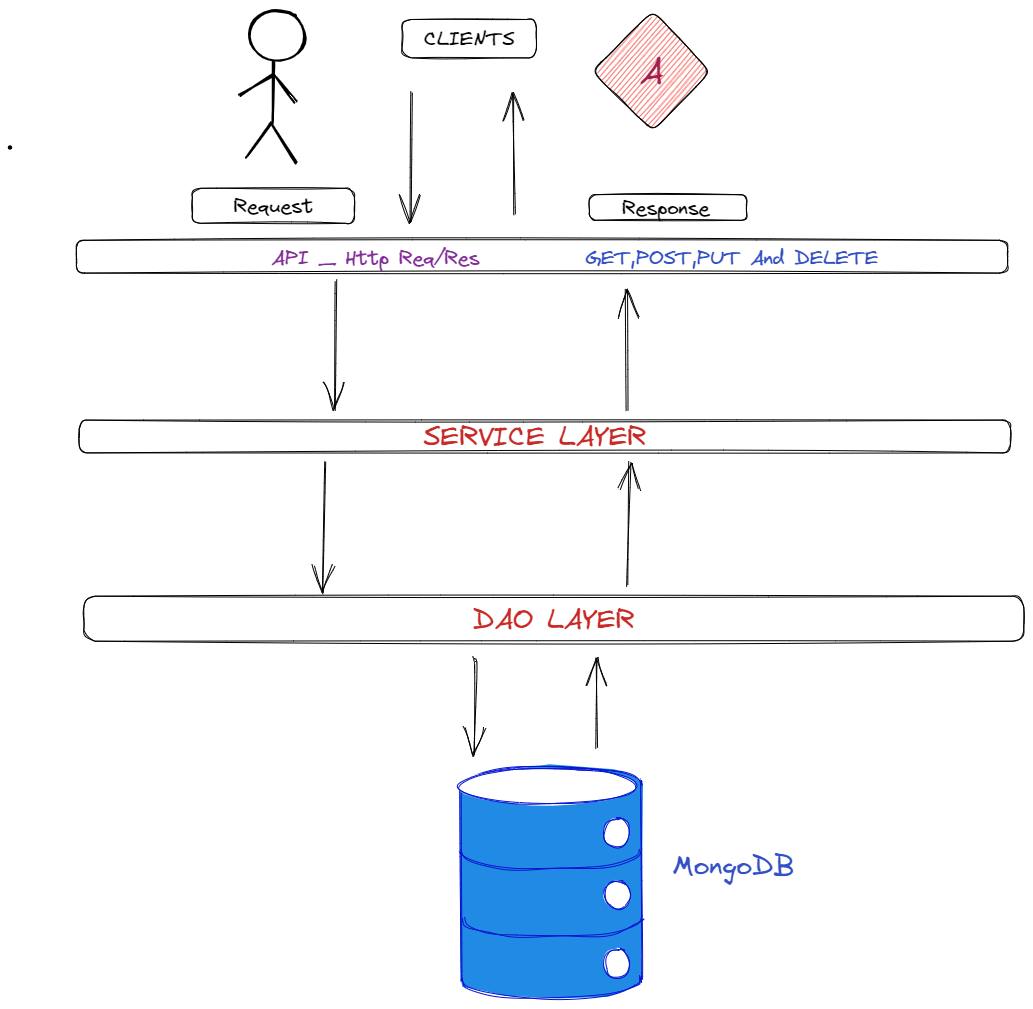
Now, we have done with configurations. Let's get started to the CRUD operation
PermalinkCreating CRUD Operations
PermalinkA) Creating Model class
Inside the project, under the com.example.demo package makes a new package name model.
Then in the package model make a class name Product. In the class declare the following variables
package com.example.demo.model;
import lombok.Data;
import lombok.NoArgsConstructor;
import lombok.AllArgsConstructor;
import org.springframework.data.annotation.Id;
import org.springframework.data.mongodb.core.mapping.Document;
@Document
@Data
@AllArgsConstructor
@NoArgsConstructor
public class Product {
    @Id
    private Long prodId;
    private String prodName;
    private double price;
    private String description;
}
In the code, the annotation Document is used to identify a domain object, which is persisted to MongoDB.
The annotation Data inherited from the Lombook dependency bundles the features of annotation like ToString , EqualsAndHashCode , Getter / Setter and RequiredArgsConstructor together.
The annotation Id specifies the MongoDB document’s primary key id. If we don’t specify anything, MongoDB will generate the _id field while creating the document.
PermalinkB) Creating Repository class
Inside the project, under the com.example.demo package makes a new package name repo.
Then in the package repo make an interface name Repository which will further extend the MongoRepository
MongoRepository extends the PagingAndSortingRepository and QueryByExampleExecutor interfaces that further extend the CrudRepository interface. MongoRepository provides all the necessary methods which help to create a CRUD application and supports the custom-derived query methods
package com.example.demo.repo;

import com.example.demo.model.Product;
import org.springframework.data.mongodb.repository.MongoRepository;

public interface Repository  extends MongoRepository<Product, Long> {
}
Inside the angular brackets , you have to provide the model name and data type of primary key, in this case it is of Long data type.
PermalinkC) Creating Service Class and ServiceImpl Interface
Inside the project, under the com.example.demo package makes a new package name service.
Then in the package service make an interface name ProductService and make the following CRUD methods.
package com.example.demo.service;
import java.util.*;
import com.example.demo.model.Product;

public interface ProductService {

    String saveProduct(Product product);
    List<Product> getAllProduct();
    Product getProductById(Long prodId);
    String deleteProductById(Long prodId);
}
Now, in the same pacakge create a class name ProductServiceImpl which will implement the ProductService interface and add all the unimplemented methods and complete the business logic.
In the class we will make an object of Repository class to access all the methods of MongoRepository.
package com.example.demo.service;

import com.example.demo.model.Product;
import com.example.demo.repo.Repository;
import org.springframework.beans.factory.annotation.Autowired;
import org.springframework.stereotype.Service;
import java.util.List;

@Service
public class ProductServiceImpl  implements  ProductService{
    @Autowired
    private Repository repo;
    @Override
    public String saveProduct(Product product) {
        repo.save(product);
        return "Product id:" +product.getProdId()+" is saved Successfully";
    }
    @Override
    public List<Product> getAllProduct() {
        return repo.findAll();
    }
    @Override
    public Product getProductById(Long prodId) {
        return repo.findById(prodId).get();
    }
    @Override
    public String deleteProductById(Long prodId) {
        boolean delete = false;
        if(repo.existsById(prodId)) {
            repo.deleteById(prodId);
            delete=true;
        }
        return "Product with id"+prodId+"deleted successfully";
    }
}
Spring Service annotation is used with classes that provide some business functionalities. Spring context will autodetect these classes when annotation-based configuration and classpath scanning is used.
Here Autowired annotation of spring framework enables you to inject the object dependency implicitly. It internally uses setter or constructor injection.
Note: Autowiring can't be used to inject primitive and string values. It works with reference only.
PermalinkD) Creating a Controller class
In this class, we will define the RestAPIs of all the CRUD operations.
package com.example.demo.controller;

import com.example.demo.model.Product;
import com.example.demo.service.ProductService;
import org.springframework.beans.factory.annotation.Autowired;
import org.springframework.http.HttpStatus;
import org.springframework.http.ResponseEntity;
import org.springframework.web.bind.annotation.*;
import java.util.List;

@RestController
@RequestMapping("/product/")
public class ProductController {
    @Autowired
    private ProductService productService;

    @PostMapping("/save")
    public ResponseEntity<String> createProduct(@RequestBody Product product) {
        return new ResponseEntity<String>(productService.saveProduct(product), HttpStatus.CREATED);
    }
    @GetMapping("/getAll")
    public ResponseEntity<List<Product>> readAllProduct() {
        return new ResponseEntity<List<Product>>(productService.getAllProduct(), HttpStatus.OK);
    }
    @GetMapping("/get/{prodId}")
    public ResponseEntity<Product> readProductById(@PathVariable Long prodId) {
        return new ResponseEntity<Product>(productService.getProductById(prodId), HttpStatus.OK);
    }
    @DeleteMapping("/delete/{prodId}")
    public ResponseEntity<String> deleteById(@PathVariable Long prodId) {
        return new ResponseEntity<String>(productService.deleteProductById(prodId), HttpStatus.OK);
    }
}
The RestController annotation in Spring is essentially just a combination of Controller and ResponseBody. This annotation was added during Spring 4.0 to remove the redundancy of declaring the ResponseBody annotation in your controller.
The PostMapping annotation maps HTTP POST requests onto specific handler methods. It is a composed annotation RequestMapping(method = RequestMethod.POST).
The GetMapping annotation assigns specified handler methods to HTTP GET requests. RequestMapping(method = RequestMethod.GET) is a constructed annotation that serves as a shorthand for RequestMapping(method = RequestMethod.GET).
The DeleteMapping annotation maps HTTP DELETE requests onto specific handler methods. It is a composed annotation that acts as a shortcut for RequestMapping(method = RequestMethod.DELETE).
In this code, we are simply calling the ProductService object and calling all the methods related to business logic, after hitting the API we will get the response with HTTP Status code in the postman.
PermalinkTesting the CRUD Operations using PostMan
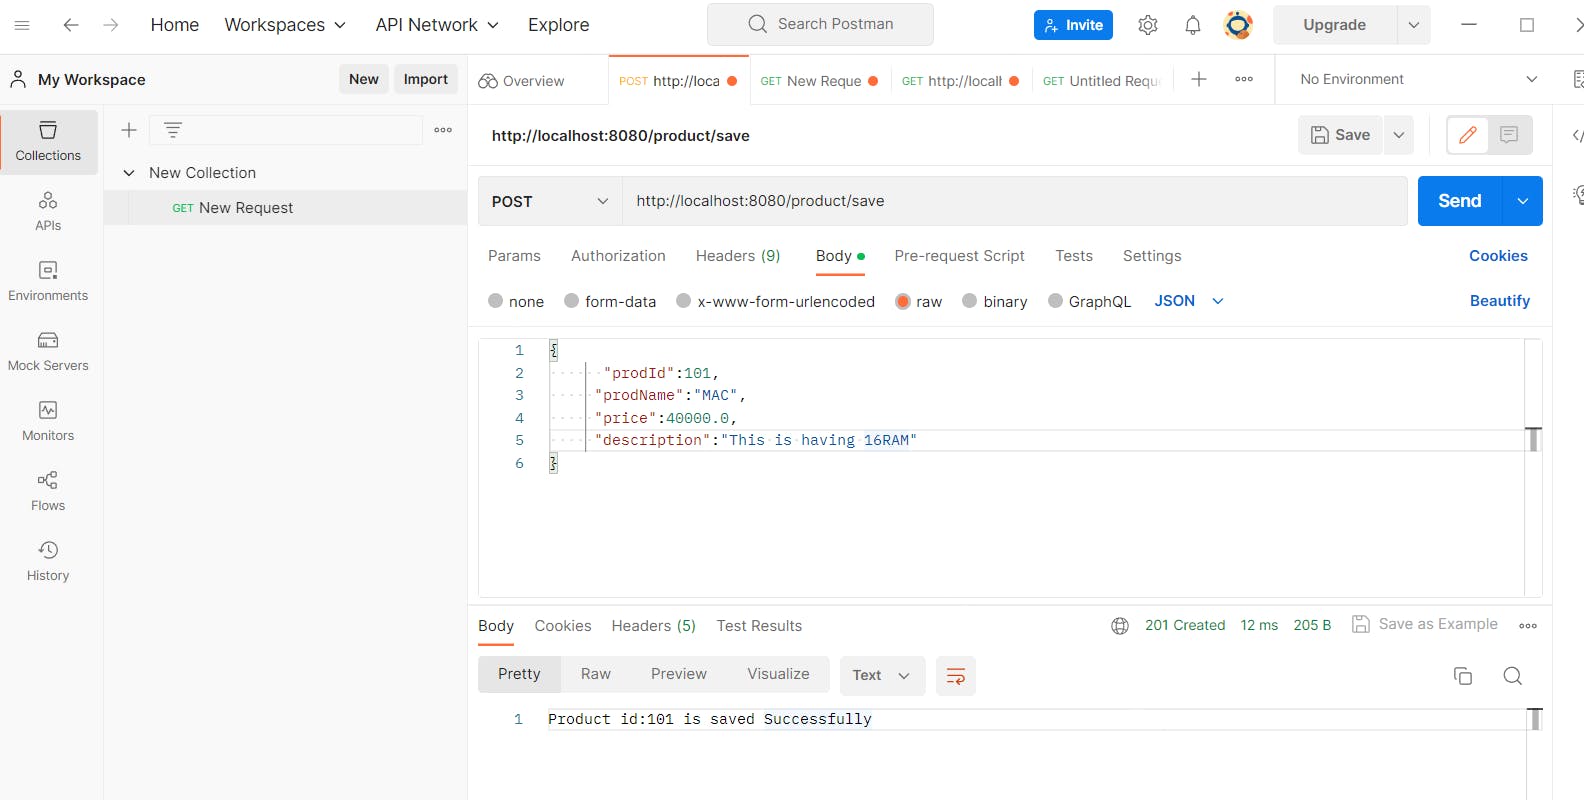
PermalinkCreating the Product by using Post Mapping
Open the Postman, select the Post Method then enter the URL in the URl bar.
Now, go to body and click on raw option -> select the text and change it to JSON. After that enter the data as per the Product class like in the image given below. Finally, click on Send Button
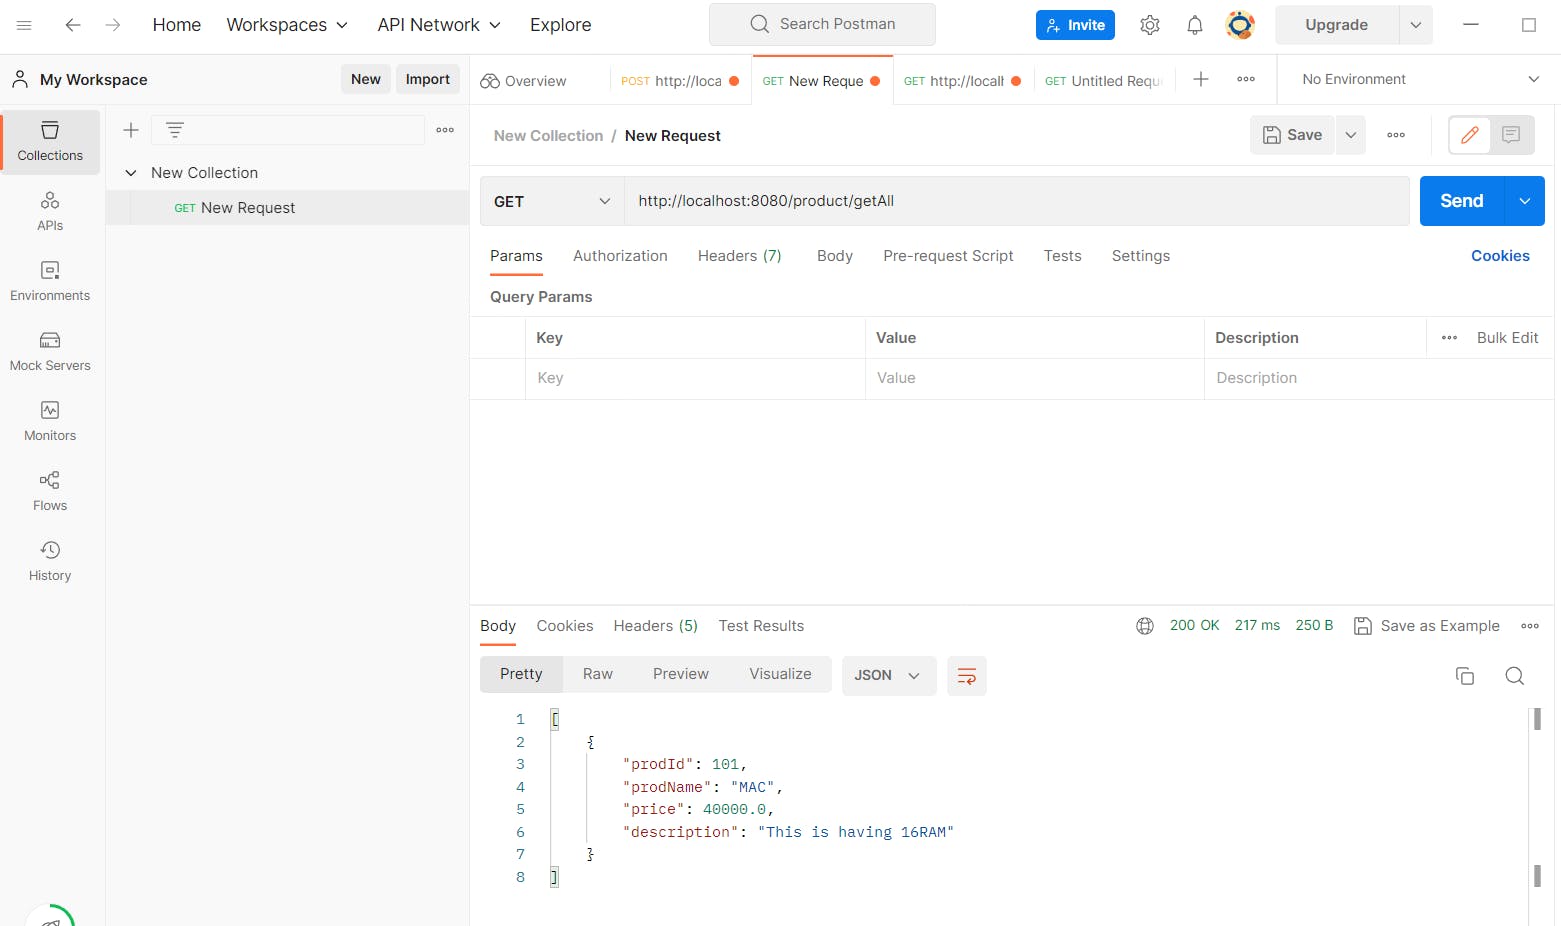
PermalinkGetting all the Products by using Get Mapping
Open the Postman, select the Get Method then enter the URL in the URL bar.
After clicking on Send Button whatever data you have inserted in the Create Method, you will get the same result as the image given below as we have created only one product.
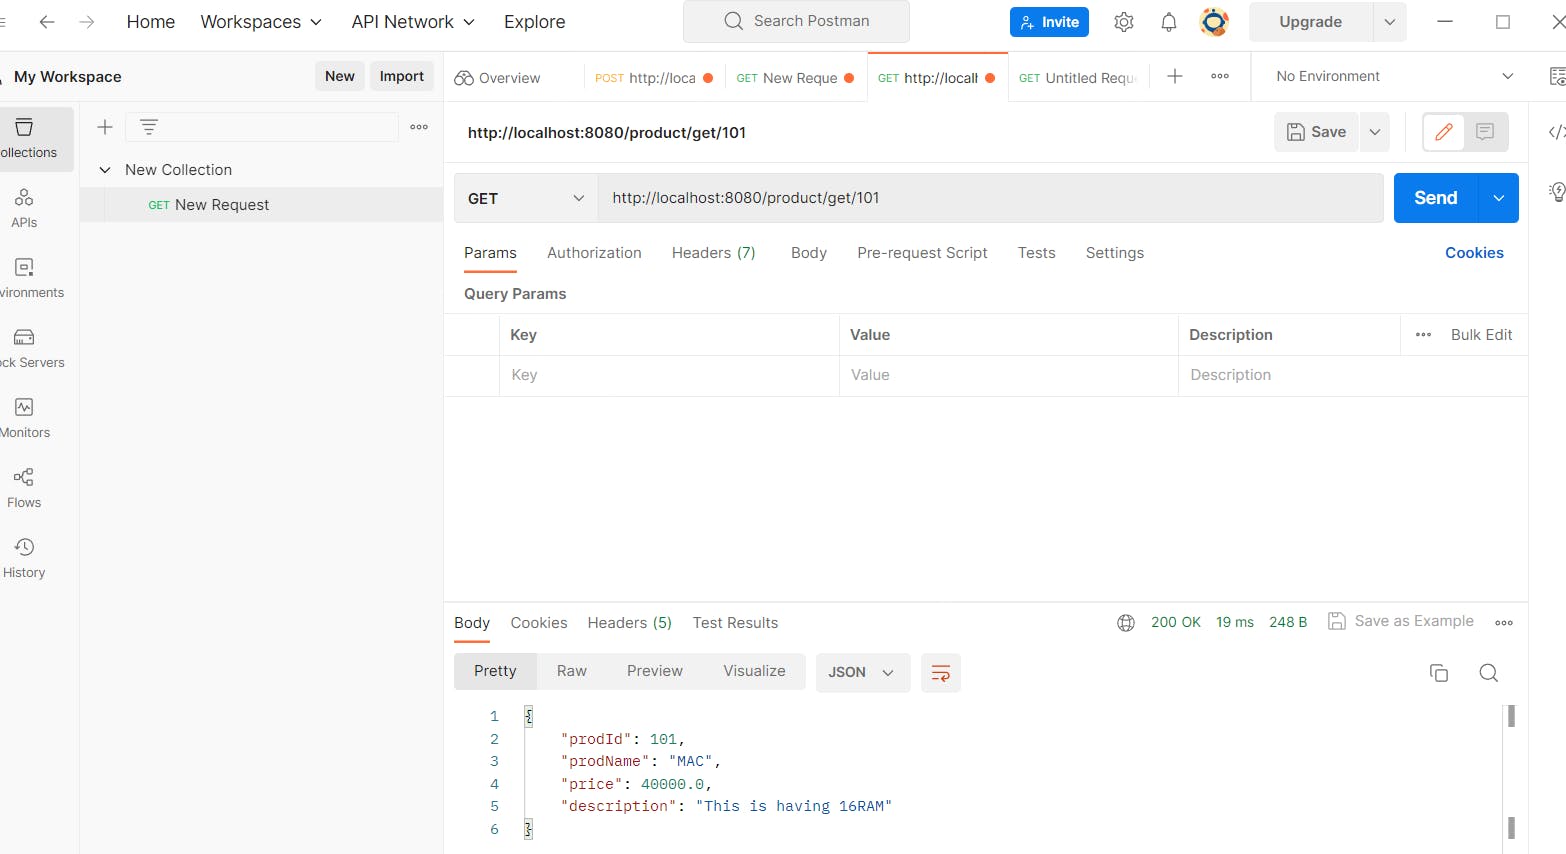
Same will go with the "Get the product by productId", you just have to change URL:
localhost:8080/product/get/101 and click on Send button.
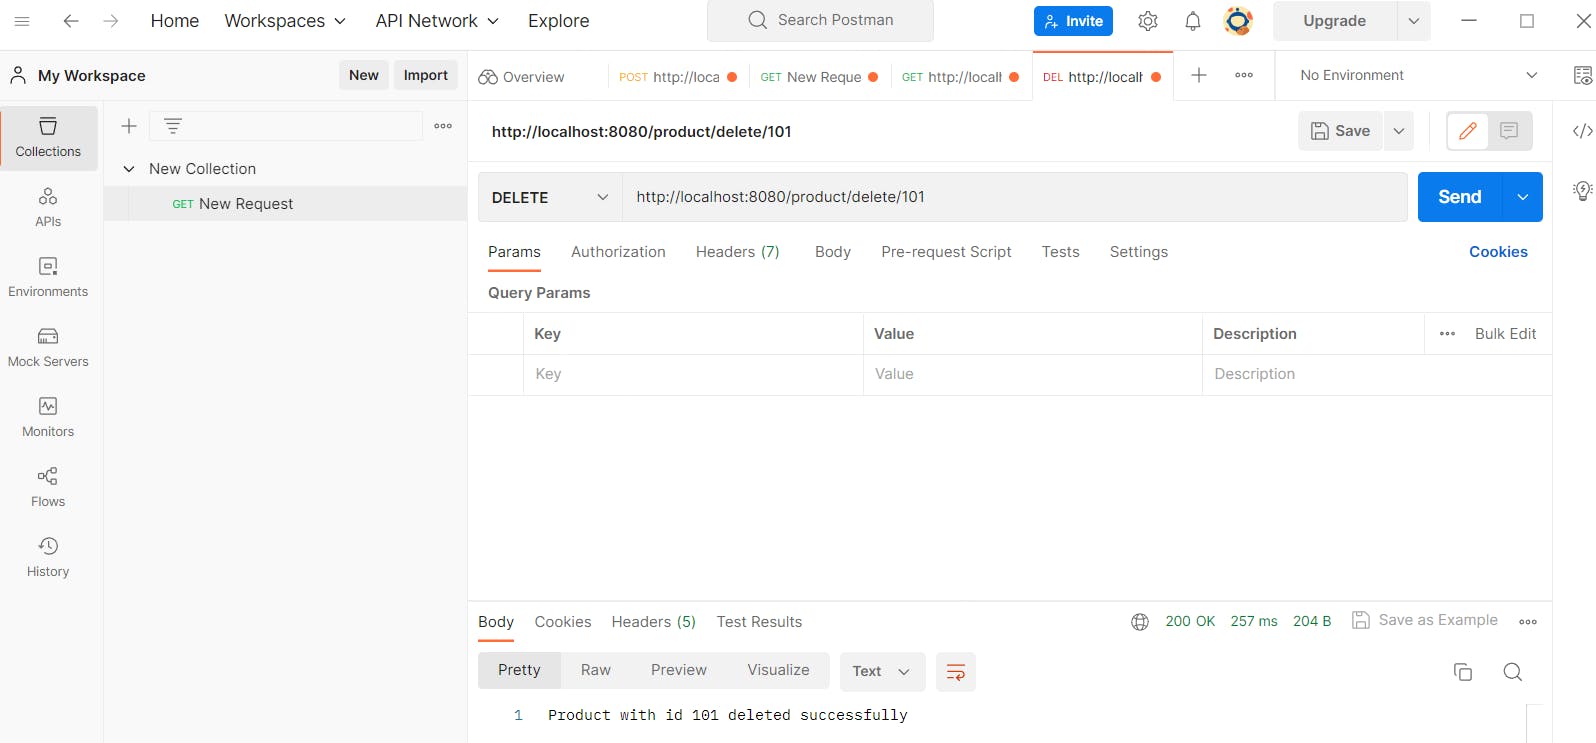
PermalinkDeleting the Product by using Delete Mapping
Select the Delete Method and type the product Id which you want to delete.
PermalinkConclusion
We covered the basics of Spring Boot and MongoDB, the importance of CRUD operations, and how to set up the environment for these operations. We also discussed how to configure MongoDB, create the necessary classes for CRUD operations, and test these operations using Postman.
Whether you're a beginner or an experienced developer, this tutorial will provide you with the knowledge and resources you need to master Spring Boot and MongoDB.